So I think it's worth it to write it down in full, with pictures.
Tips: skip the sidenote for pure story of How It's Made. It's just me rumbling around and it tends to happen when I write. It doesn't affect the full story but it's relevant enough. I tried to put in in different color but again, blogspot feature can be annoyingly unresponsive many times.
See? Yup, here we have the first one already!note: I'm never good in documenting. I only take scenery during most of the trips I went, then found out it's lack of continuity and pictorial descriptions when I write the journal. Reasons because it's inconvinient to whip out camera anytime, and I also have 'camera concern' (they don't have term for 'narsistic-opposite/anti narsistic' yet?), so as much as I really want to take picture of locals and everything in their daily life, I always share the feeling of not wanting to invade their privacy). Above all reason, I'm actually LAZY. Yah, that is probably the most accurate. He he... So it's always nice when I travel with travel mates who are good in documenting, from airport, food, street name etc to help me with my journal later on.way, for this one, I really try to document everything I could. Of course I miss some, still, but it's not that bad. There are a lot of pictures!'
It would be a full scale double diorama with a lot of details and cute stuffs, full of colors and story, and I imagine I would have a lot of fun making it.ARTING
I have collected some amount of miniature for the span of 3+ years. Mostly they are from the older days of diorama when the details and varieties are still very nice. Nowadays, not so.
From every piece that I have, I have imagination of what kind of diorama I can create.
'Sidenote: So I actually have unoficial (read: written somewhere, normally at the back of any kind of writing material I'm holding when I started to think about minis, always missing and need to be rewritten everytime) list and had crossed some of them.
Done: bakery shop + cozy corner, fruit stall, old traditional kitchen, girl's bedroom, kindergarten, mahjong room, restaurant, laundry room.
The ones that are still on my list such as beach, back yard, bathroom, birthday party, market, mama shop, boutique, confectionery, nursery, full size kitchen, street food. It might or might not happen because there might not be enough material.'
Anyway, I like to stroll through 'weird' and unusual toy, craft or stationery shop.
Normally I found things like art & craft stuff, fabric, stationery that I like, I will buy them without planning and most of them ended up being useful. There are a lot of examples that I will put along the way.
Back then there used to be an old style stationery shop below my block and I could always find something interesting. Now that traditional and modern stationery shop below (there were two!) had been replaced by other shops. Maybe I'm the only one who miss them, but I do.
Anyway, this is the example of how the diorama idea started.
So I have this cute set.
 This set consists of ten small boxes of school related thingy. I bought the last box (the pink sewing box) separately from e-bay long long time before I found the entire set at reasonable price.
Out of the blue, I found the set when I went to Taman Anggrek Mall Jakarta in 2010, I had few hours of transit after a trip and my friend wanted to know how Jakarta mall looked like, so I chose Taman Anggrek (my Jakarta knowledge is sooooo year 2000), we took a cab from the airport, spend two-three hours there and went back to catch our flight.

Box 10. Sewing kits

Box 3, chemistry experiment equipments.
Box 4, musical instruments.
The suitable diorama to display this set is in classroom setting. It's almost one and only option, unless I separate them out for supporting other diorama, which is not a rare idea but not for box no.3.
Anyway, even for classroom, I actually only have so much material. For the whole set above, there is only 3 full box that I can use; sewing kit, laboratory & musical instruments. I can use some pieces for the rest of the boxes but it's quite dissapointing that I can't use the bag on 1st and 2nd boxes, because they are slightly too big to be put together with my other school bags. Anyway, they are monotone and waste too much space to be incorporated.
So, long story short,
Okay, classroom diorama it is.
What is next....
ETCHING
Sketching is not a must-do, for some diorama they are very minimal to none, especially the earlier ones. However, for this one, I need a lot of planning to get it to the standard that I want.
spent a lot of time in sketching, partly because I didn't have the mood to actually start building it for sometime, so I would just refine the sketchings and ideas.
 This is one of the unofficial list and the first time the classroom idea was throw into play. I named it kindergarten with wrong spelling still. I already had kindergarten and the activities here are way too mature for kindergarten. But I just anyhow named it. Scribble paper is not for judging.
(Decide to call this Hobby Classroom at the end. I'm sucker at names I know)
See the preliminary planning is single diorama with basic classroom layout. Few pieces of table, blackboard, some cabinet. I toyed with this idea for some time, but didn't like it. My three main displays are sewing, chemistry and music. How on earth should I have to put each theme in each table and make sense? A classroom setting like that is suitable for something uniform. Same table, same seating, same book, same subject of learning. Maybe different stationeries which certainly not what I'm looking for. They don't need blackboard too.
 The idea developed. What I should do is to create a classroom, but an unusual classroom. At first I'm worried that I didn't have enough material to fill it up (again, the idea started with only 3 usable boxes), eventually I found ideas enough to even pull a double diorama, and to make it interesting, with a mezzanine. Light bulb has 'ting' ..
'Sidenote:'Sidenote: Reason why I want to make a mezzanine is to create a cosy corner with children scale.
 sketches
 sketches
sketching is not messy, so it was still possible to do it mobile, before sleep, while watching teve, I dragged this process a bit longer because once I started with the works, there is no turning back until I finish, the mess, eye strain, back pain, sticky and colorful fingers, etc etc..
 I don't really do full scale sketch much, but it's quite essential now because I have to make the furnitures myself. With very limited space, precision certainly helps a lot in producing and not wasting materials.
 sketches
 voila
voila
 my favorite ruler, be-loo-dy usefull that I have three of those. Well, not because I need three, because I abuse them greatly, unintended. First one is not perpendicular anymore because I cut with it (yah, it's horrible but it's really help the accuracy). Second one is melted. Yes, melted. No I didn't use flamethrower. Yes, I'm still not allowed to have my own flamethrower. It's melted because i put it together in the drawer with UHU glue, that leaked all over the ruler and melted the plastic. Powerful UHU!
ORK STATION
WORK STATIONThis is my work station, it's small, but not bad. Anyway just outside the picture, I have a neat charging station (read: few power socket), so I can listen to music or podcast, plug in my laptop to watch anything if I want some visual company, play WOF and other games while charging my handphone, plug my glue gun if needed.


I try to keep it neat at all times. But when I'm working on something, it looks like train wreck with spilled paints plus a dozen of chickens and ducks running around.
 Stationery drawer. Before I have this, I can't even find a pen easily. Now this helps a lot. Believe me.
Below is where I keep my art&craft stuff. It's only been up for about a year plus. With very very limited space, these containers really help keeping it neat. Anyway, it's also fast and efficient when I start packing it back, after I scatter every box and everything inside the boxes all over my room when I'm working on diorama.

 But I hate all these paper roll, they fill the spaces in between nicely, but not nice to look at.
 Inside the boxes are all the bit and pieces thingy that I have, fabric, wooden pieces, glue, ribbons, sponges, paints, wire, brushes, sticks, strings, beads, mats etc etc. For bigger pieces I put it somewhere else. Ah ya, the UNO Stacko doesn't belong there, the weight also. The purpose of the weight is to keep the box's lids neat by gravity. He he.. the UNO was out because initially I dug it out from my store room so that I can play it with friends in a short trip few weeks earlier (but I ended up never bring it because it was too bulky and my friends are way more resourceful with games).
PREP
EP
ince I'm documenting this down, this diorama probably has the best preparation. No rush, nothing compensated, I try to make everything as satisfactory as possible and take my time.
 This is the print out of children book covers. Easy, internet search, photoshop to put them efficiently and access to printing. I need a lot lot lots of books.
 These are the candidate of the possible minis that I would probably use for the diorama. I never did this for other diorama, but for this one I really have to make sure that I have enough to display. I ended up using probably only about 35-40% of them, the rest I have to improvize from another sets.
MEZZANINE
THE MEZZANINEStarting the work by creating the mezanine first. No product placement here, but I happened to have a box that is very suitable for the mezzanine because of the thickness. For the rest, I can add many small boxes to make up for the size and the steps.
 Tiny boxes from toys
 Paper stuffing from unused brochures. There are unlimited amount of brochures you can find in every mailbox here daily. It's amazing how many waste papers are produces by advertisement industry.

 The small boxes are the boxes I kept from toys, I hardly keep boxes, somehow luckily I know those neat boxes will come in handy someday.
 With a layer of thin cardboard + wood texture sticker for the floor, and brown sticker for the section, here comes the mezzanine.
 These are the table mat I got from IKEA for good price. It has nice color choices (although I can't find the Olive color, it's in the dining room display, but they don't have stock for sale. No particular reason why I want the olive except I like it). These mats suitable for minis because of the fine texture and material. They already have some cameos in my previous dioramas.
 During the making, I felt that carpet floor is more suitable for the mezanine because it's supposed to be more cozy area. Instead of changing and ruining the existing wooden sticker, I just add it to the top. It added significant thickness and problem at the end when I try to fit in into the display cabinet.
Since I ran out of balsa wood, I explore new shop I found few months ago, and found their price is significanly cheaper than Art & Friend. It's a engineering model shop that sell kits for remote control. So they have new customer.

Balsa wood is favourite for crafting, because it's easy to cut using only cutter. The downside, it's more expensive and not good for painting. The wood might bend and the color won't look as nice as normal wood. However, even with the downside, it's still preferred choice compare to the option of having to use woodsaw for crafting.
THE FURNITURES
 Since I have a lot of furnitures to do, I decided to mark on the wood to get efficient cutting and minimize wasting of material. However, it's very very bad idea, because apparently it can't be covered with many many many layers of paint. So I will go back to my old way of just hacking it instead of playing neat and nerd by marking them first.
 cut cut cut
 The making of the book. Wood, book cover print and glue.
 Wah... am I making way too many. Actually I planned to make more but I stopped myself.
 Temporary container for the books.
Now I'm starting to make the major components of the dioramas:
E MINI KITCHEN
 Look at this cute kitchen above, it's produced by a manufacturer that has stopped making miniature, so it's a vintage! But came into my possesion at reasonable price, much to my delight. However, there is one unknown problem until I saw the real thing. The size is too small to go with other miniature. It's children size (in mini), probably can pass as something like Easy Baked Oven, or those realistic kitchen toys for kids.
That is why I think it's appropriate to be part of classromm, where the main users are children, a reason to have mini children scale kitchen there. And this is also the reason why I dared to span the diorama into double diorama because kitchen is already a big filler of the space.
The sink and the oven will be lonely by themselves, so I will create more extensive kitchen with numerous cabinets.

After the plannings and cuttings etc, here is the cabinet.

 Using poster paint, I'm trying my best to match the beige color. Mixing color can be tricky and difficult to repeat, that's why it's good to make sure that I made enough amount. Sometimes I mix way way way too much paint but the paint can be stored inside very tight mini container and still can be used perfectly in the future. For this project, as the local slang is, the paint's amount are all 'cun cun sui sui'. No more no less.
 Now I'm trying to match the darker yellow (on the sink) and brown (on the oven).

 Painting started and there comes unfortunate revelation that no matter how many layers I put on the wood, the pen marking would still appear.
 Preliminary fitting with colors.
 Ohya, there seems to be a lot of colors in my pallete, but it's not. Above is the picture of my palletes in CLEAN condition. The colors are permanent, resulted from perhaps 'too lazy to clean fast enough' from previous project, especially if I used fabric paint, which is more rubbery, fast drying and almost impossible to wash away once they stick (that's why they are good for fabric!)
 Ohya, I have this nice looking watercolor brought from neighborhood market long long time ago. I thought I can use it to color some wooden stick but watercolor is not meant for wood.
OTHER FURNITURES
Now I will put together other furnitures.

Notice that I purposely made hole at the cabinet corner, to fit it in my display cabinet nicely. This can be PITA (Pain in the ass) and spoil the look, but if I forget to take it into account, I will have to hack the completed diorama later on or find another cabinet to display. None of them is good option.
'Sidenote: In my previous laundry room diorama, I made a full cabinet and forget to allow some space in the corner for the rack support. Since it's impossible to cut it without damaging the diorama, I push the whole cabinet in front, resulted in diorama being shallower than the others. Luckily, Laundry Room didn't have a lot of display in front.
 This is the book rack for the art & craft mezzanine.
 Chemistry laboratory table & chairs, sewing cabinet & drawer, stepping chair, staircases etc.
 Sofa cabinets, wooden stick and low tables.
 These are all the main furnitures, clockwise: kitchen cabinets, laboratory table & chair, sewing cabinet, book rack, sofa cabinet, tables for each class subject and Doraemon stepping chair.
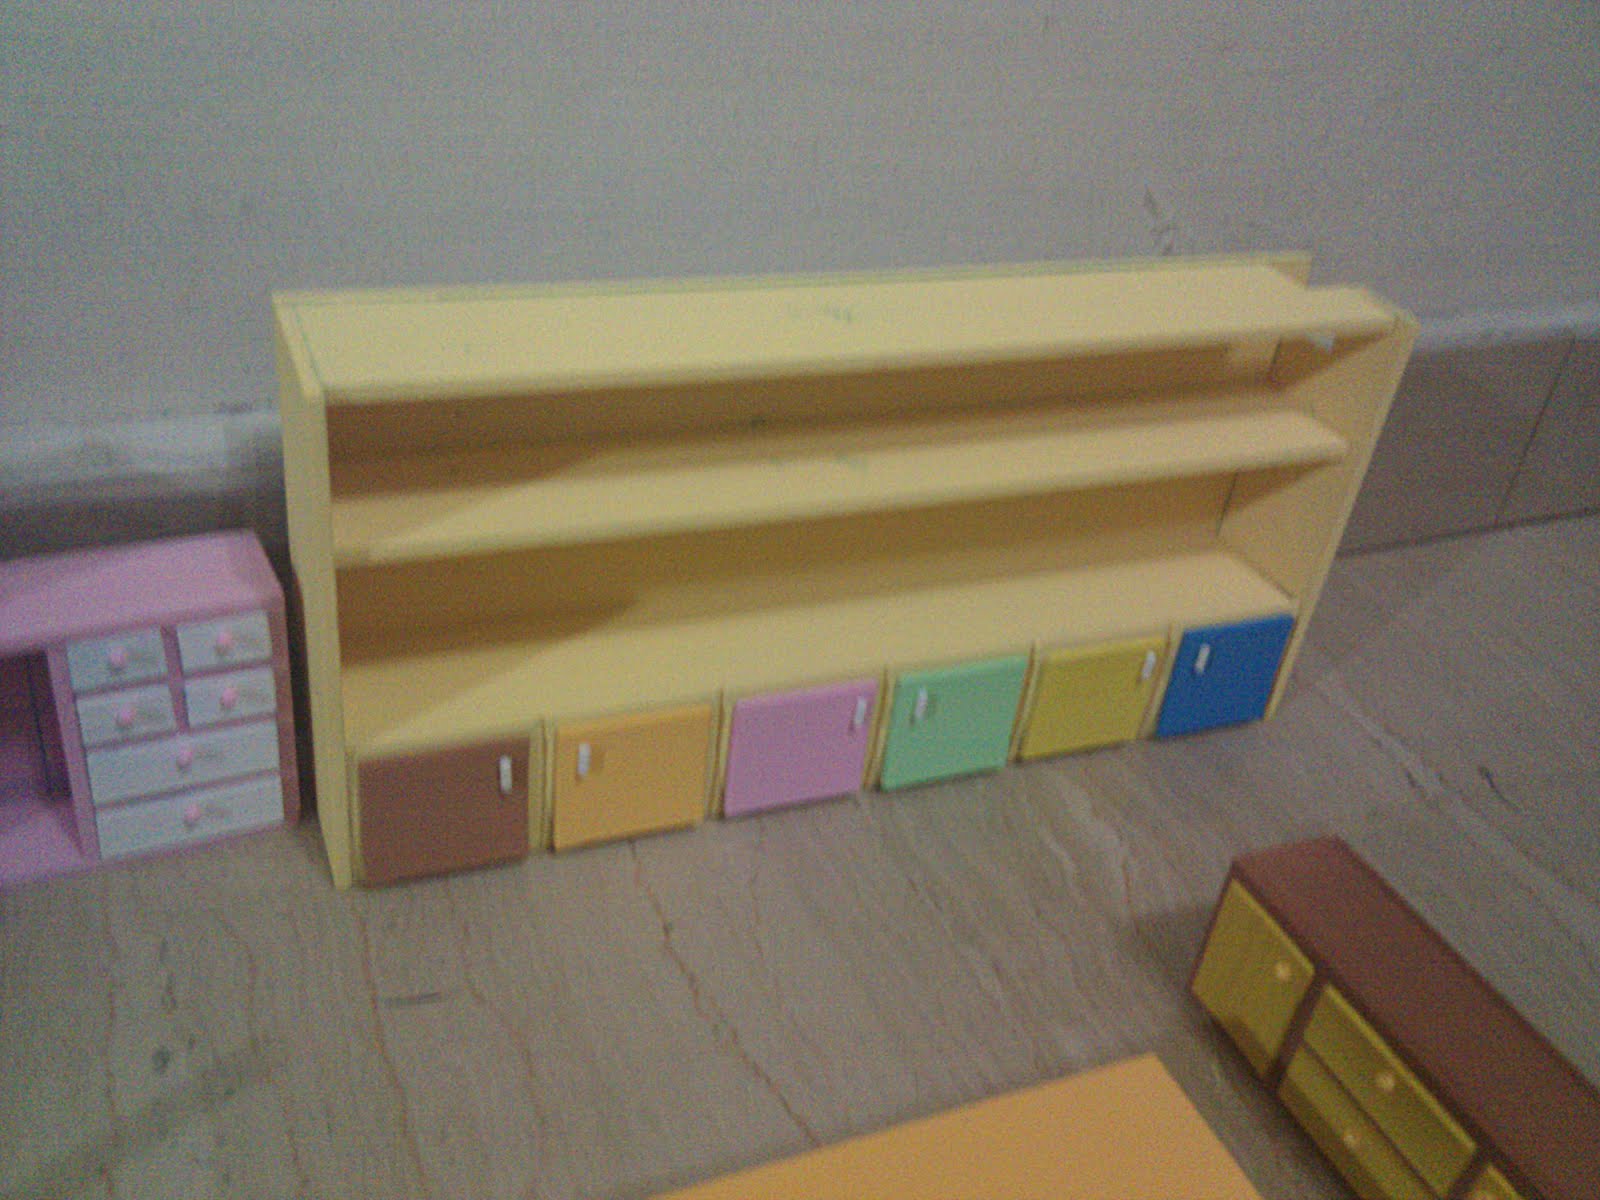 Book rack, each color of the locker represents the colors I had used previously.
 Sewing cabinet and sewing drawer. Note that the left side are seriously scarred from the marking, which need some damage control later on.
 Chemistry laboratory table and high chair.
 Doraemon stepping chair
AFTS
CRAFT
Since I have quite limited relevant mini that I can display, I have to make some.
 I need more musical instruments. These are xylophones, made from painted wood and clay for the button and round end. The small white buttons are driving me crazy for the whole course of the project. They - don't - stick - easily and they are too freaking small for glue applications.
 Some of discovery might not see daylight for years. Such as these ones, I bought it 12 years ago (!) for a model making project that actually made money. These are ... uh.. furry bits, not sure what they are for.
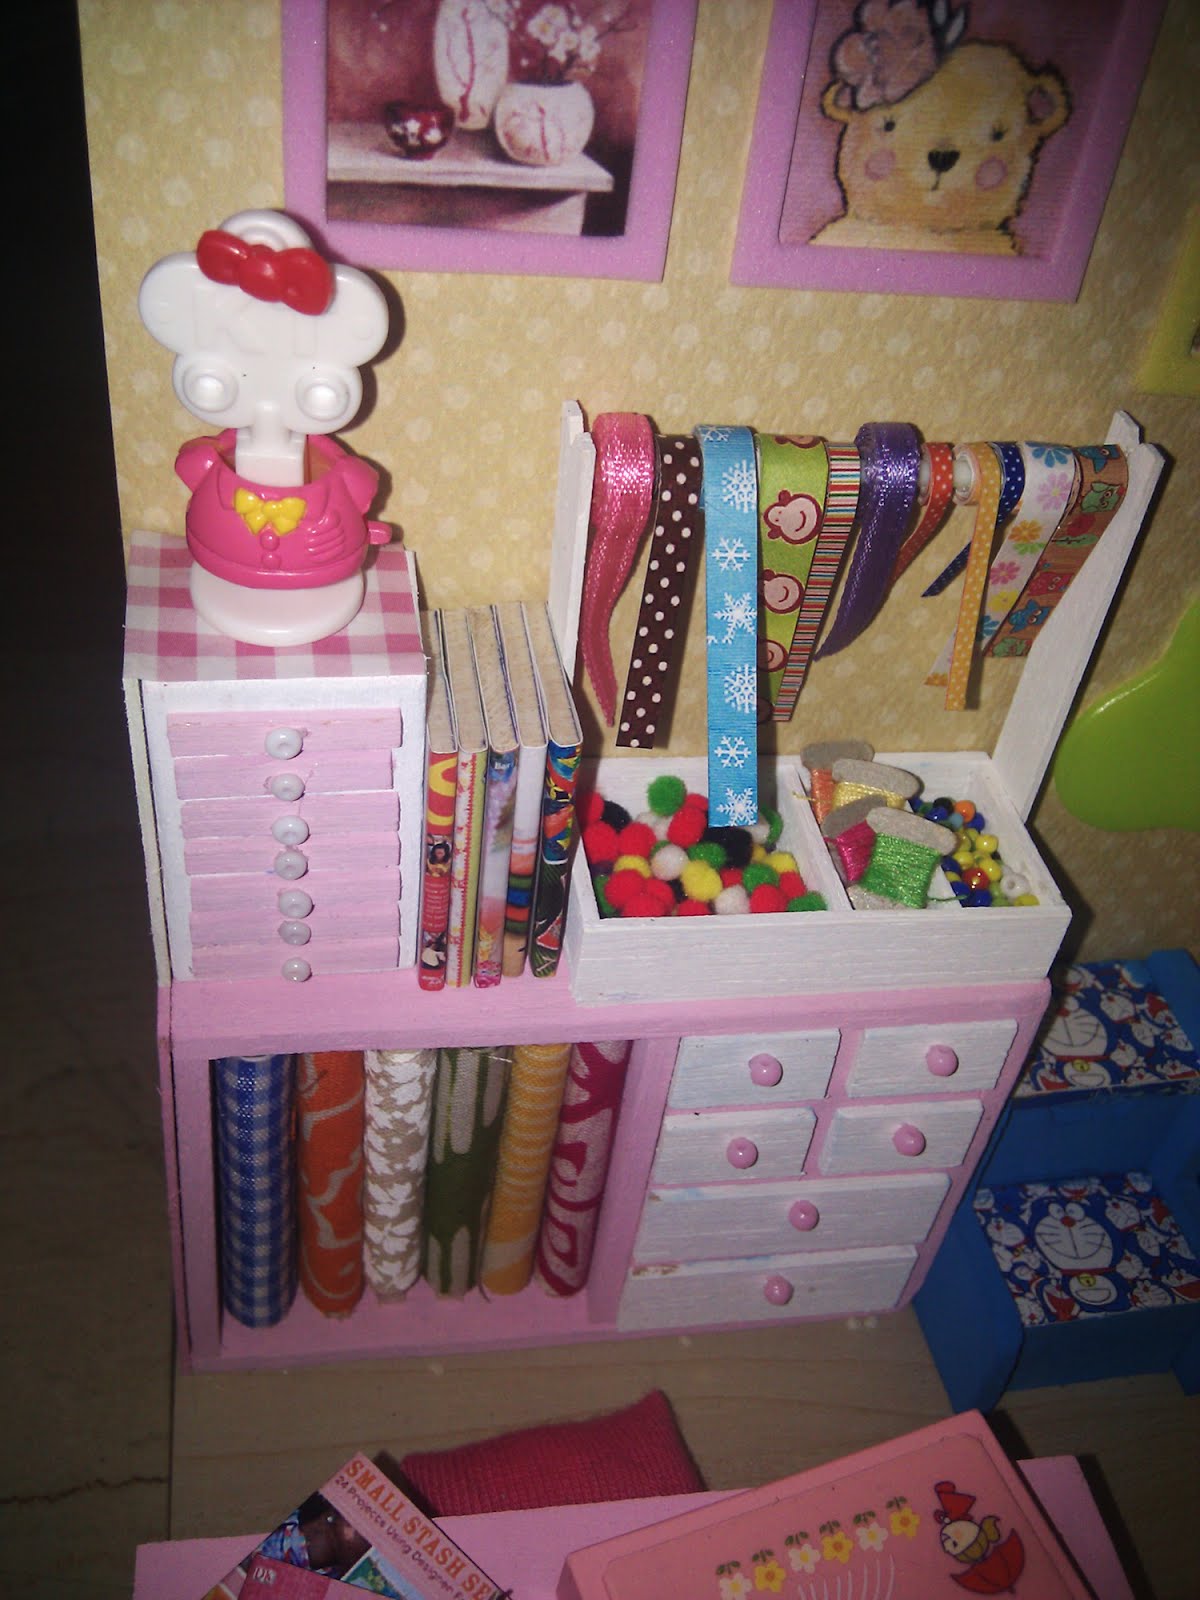
 I use them to fill this 'pieces & bits' rack, together with the realistic-color beads I just got few days ago.

 Since I only have very limited pieces of small-patterned fabric (leftover from another DIY projects), I have to find a way to make it look like a full roll.
 So, it's cheating using paper.
 Fabric station
 I'm making some string rolls using real strings and hard paper.
 Before I find out a simple white piece of plastic and string can do real wonder.
 Check this out. The string rolls look really realistic.
 Another printing works for measurement tape and ribbons.
 There comes the ribbon station.
 I have to dig the whole bottle of beads to find a similar looking white beads to be used as drawer handle for sewing. But, look at the first 20 white beads I dig out, none of them are in the same shape and size.

 It could probably be a perfect prop to display these eight adorable strawberry pattern transparent tea cup from independent unknown brand, love them!

 Super duper cute mini strawberry patterned glass cup
 I'm sucker for paper, I love colorful papers. These are tiny origami paper in my possesion for a long time. Back then I used it to make 1000 origami birds for well wishes for one of my relatives.
 It has 14 different colors.
 With just one pages for each color, I could make a stack of mini origami paper in the size of 1.5 X 1.5 cm. For the fun (and suffering) of it, I made the mini origami birds also.
I think it's close with the world record size for mini origami bird!
 Ice cream stick is popular props for arts and craft in real world. So I have to include them in the mini. If cutting them is not much of a problem, painting them is quite a messy affair. I managed to make 8 different colors.
 I need washing soap. This is made from clay, paper and printed label. This is an unplanned object and I'm pleased with the result.
'Sidenote: sometimes I have good idea about how to make an object, but it ended up in disaster and failure. Sometimes I thought it wouldn't be decent and it ends up working well visually. I love this handwashing soap. It's really an emergency put up plan. I only have a very very small lump of yellow clay and soap label I printed for my previous Laundry Room diorama.'
 It's my luck that I found this art wire by chance.
 With that and some thin craft mattresses, I can make tiny slippers
 without glue, good for me
 Why I say everything without glue is good for me? Because of these horrifying molecules that I make to add to the chemistry scene. It was killing me, everything falls apart one at a time. I glued my hand to the table, to each other, in the joint, lost part of my finger prints, and it's still an ongoing battle long after it was supposed to be a completed object.
 This is the uglier tryout version of the molecule, I might still use it to add colors.
 I need more things for my chemistry laboratory, but there are not many objects suitable.
As I mentioned previously, I am not a collector, I'm a just freak hobbyist. That's why I don't fancy spending unreasonable amount of money to hunt for those items that I like (well, main reason because I can't afford to do so). Some of these products are sold at very ridiculous prices, some collectors buy two or three same kind sets just so that they still have the original untouched set when they used the others. Some bought them just to look and to keep. Blessing in disguise, I enter this hobby a bit too late that many of the manufacturers do not produce good quality minis anymore. It's not good, but it's good for the pocket.

Beside full sets, I have loose boxes that normally sold at more friendly prices.
So, let's start utilize some of the minis!

This is a more recent set, I got is as a gift from a good friend of mine when he went to the mother country of the minis (Japan) and he got me this cute box. It based on Rilakkuma character.
 This is the contain of the box
 It has a very cute pan that will fit very nicely on the mini stove in the mini kitchen.
 This is a doggy hot water flask from another set, same manufacturer with the kitchen set. It's small and nice, and the childish doggy theme will be suitable.
 This is another set that is suitable for mini kitchen and it's very kiddy.
 Real porcelain cups from independent manufacturer
 Another random eraser set that happens to fit into the diorama
 Doraemon super mini sticker to decorate the blue backpack
 Cute bags from various sets + the eraser blue doraemon bag
 Ball from another set, I happen to have the net from a random eraser set
 Book set with traditional carrying band, I still had one of those band in real-life size, a gift from my cousin-sister. This is from another kiddy miniature set.
 A Hello Kitty box. It's slightly big, but so called used for keeping art & craft mini stuffs.
 Mushroom tic-tac-toe set! No one is winning.
 Watering can, another eraser piece.
Can of colorful paper roll, random addition to the scene
'Sidenote: I was in 2nd grade when I came early to school one day and found a set of brand new gorgeous eraser shaped as yellow slipper with red bans on the floor. As owner of inheritated white green eraser with picture of country flag (maybe those in thirties can relate to this), it's a very luxurious thing for me and became my lucky charm. I wish that many children nowadays still treasure little things like we did last time. Anyway, eventhough fancy erasers are normally useless for erasing, keep making them manufacturers!'
 Tiny tiny rabbit toy
 Mini book, it's actually a very accurate functional books, with pages, lines for writing and everything.
 This is one of my favorite favorite sets, look at this, mini watercolor set of ten with each individual paint bottle. Faint!
It always breaks my heart a little that I have to open and use minis, especially the ones that I like and very difficult to find in the market anymore, however, I believe they will be happier in diorama instead of hidden in the box. (I just happened to watch Toy Story marathon)
 Mini skipping rope from box no.8
I've forgotten to take many mini pictures that I use, but you can see them in the completed diorama.
Now....
PUTTING EVERYTHING TOGETHER
PUTTING ALL TOGETHERThe completion time!
 Slipper rack below the staircase to roof garden. If you don't want to get your feet dirty, grab a slipper before you go to the roof deck. Of course I support barefooting also, as long as you wash them before you come back.

Access to the roof garden. With all the fun with cooking, sewing, chemistry, art & craft, don't tell me I forget something important because I'm not. Of course there are plants, outdoor, skies, but it's located up there you can't see. Climb this ladder with the guide of the lady bugs.
(Lady bug is made from normal hole puncher + white pen)
 Enjoy some sports when you are up there, skipping, ball, don't forget to bring the can up to water the plant. Added a tiny pattern to live up the yellow water can.
ART & CRAFT STATION
 Water color set + paintings
 Color sticks
Homer Simpson 3d origami set. Making the tiny 3d origami head is quite a pain in the ass too.
 Stack, colorful and pattered origami papers with the origami birds
The tiny dinosaurs and animals are eraser set I got from a random bookshop last year.
 Added in the unfinished octopus and lump of clay
The most important test, those tiny pieces should be able to fight gravity.

 Basket & flask
 Cereal collection from real cereal labels in the market
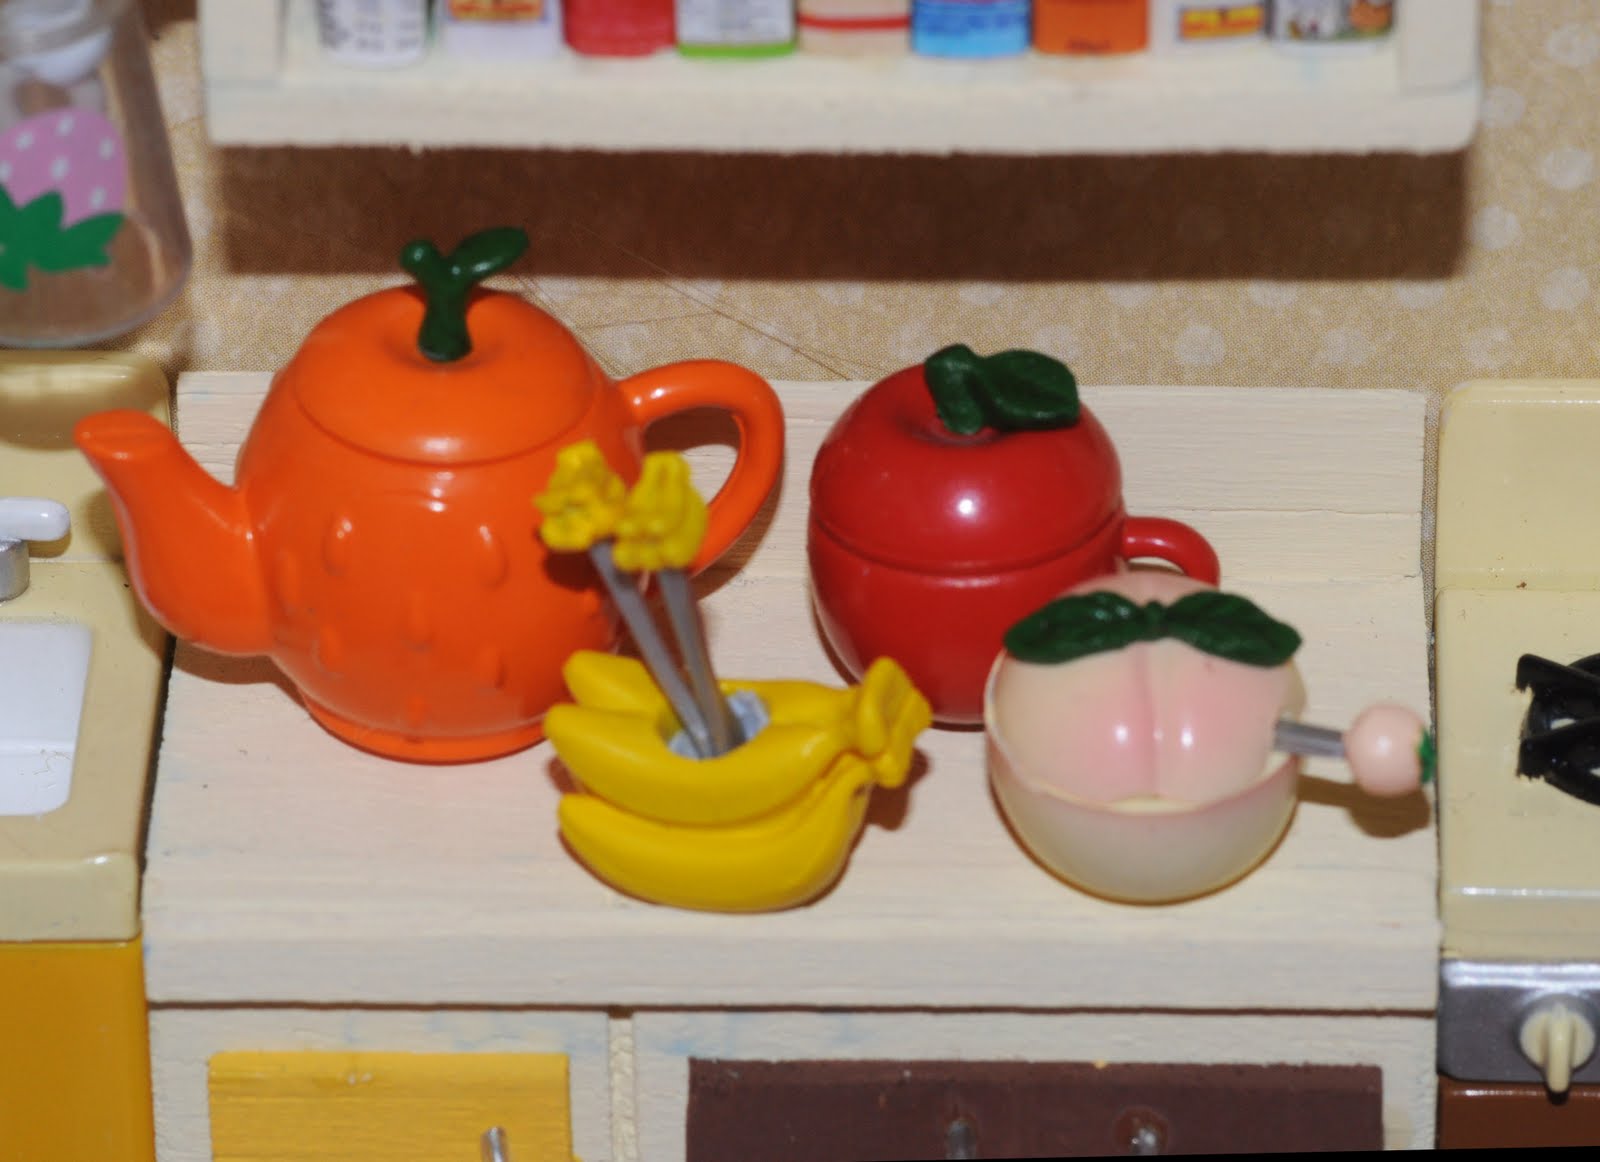 Cute kiddy theme kitchen set, just nice
 Washing dishes will never be easier with 3 choices of sponges
 Completed kitchen scene
I have the extensive cereal rack idea based on what I saw from Seinfeld. I always notice that he has something similar. If you like cereal for breakfast, I don't see there is anything wrong with having that many choices!

Nice chemistry experiment set. I add in the pipe, pipe is leftover from bead's necklace string.
 Nice lab bottles and cute wooden rack
 Molecules
 This is the completed chemistry station. Beside the original sets, and things that I made, I added in a mushroom shaped candle and transparent base from another set, and 'pipe' from the leftover of bead necklace I made for my niece.
This station has to be all nerdy, Periodic Table of Elements, Molecule, chemistry reaction etc etc. Chemistry is my favorite subject in high school. Yah.. nerd? I remember all the arrangement of the periodic table back then, with all the numbers and codes. Now I can't remember beyond H2O. I will move the molecule to the table when the diorama is split into two inside the display cabinet.
BOOK & SOFA CABINET


Completed book cabinet with spidey
 This is the completed sofa cabinet and message board in the art&craft room. Originally I want to put kiddy calender but scrapped the plan last minute because my attempts turned out horrific. So calender is replaced with message board decorated with children crafts and colorful post-it notes.
SEWING CABINET

 I like the measuring tape. It's quite brutal to create..
 Ribbon + bits & pieces station
The finished sewing table. It's pinkish!
 Sewing cabinet for fabric, beads, buttons, models, ribbons etc. Edge wooden piece that is quite unpleasant to the eyes is actually added to cover up the other unpleasant-to-the-eyes because of leftover marking on the wood.
NOW THE WHOLE COMPLETED HOBBY CLASSROOM


